SSH无密码登录及putty设置

技术 秋水逸冰 39686浏览 18评论

Linux

  一般Linux的VPS比Windows的便宜,所以手上的几个VPS清一色Linux发行版CentOS系统。拿到root权限的账号,系统随机生成的密码比较复杂,一般我们为了方便记忆都会改成自己能记得住的,然而这是不安全的。但凡用到密码的地方都只是看似安全。所以,在开通了Linux系统的VPS后,我们有必要对SSH登录做一些基本的安全设置。
  这其中利用公钥和私钥就能实现SSH无密码登录。按照如下步骤操作:
1、生成公钥和私钥
  Linux系统中绝大部分的发行版都是用OpenSSH,所以生成公钥私钥的时候最好用ssh-keygen命令,如果用putty自带的PUTTYGEN.EXE生成会不兼容OpenSSH,从而会导致登录时出现server refused our key错误。

  用root登录后运行命令如下。

ssh-keygen -t rsa
Generating public/private rsa key pair.
Enter file in which to save the key (/root/.ssh/id_rsa):    ##直接回车默认路径
Created directory '/root/.ssh'.
Enter passphrase (empty for no passphrase):                 ##输入密码短语(留空则直接回车)
Enter same passphrase again:                                ##重复密码短语
Your identification has been saved in /root/.ssh/id_rsa.
Your public key has been saved in /root/.ssh/id_rsa.pub.
The key fingerprint is:
04:e1:93:92:95:ba:55:21:58:05:7d:57:58:92:32:d3 root@vpn
The key's randomart image is:
+--[ RSA 2048]----+
|     oB*o. ..=o  |
|    .+.+o = E.   |
|    o.+... =     |
|    ...o         |
|     o  S        |
|    .            |
|                 |
|                 |
|                 |
+-----------------+

在/root/.ssh/目录下生成了2个文件,id_rsa为私钥,id_rsa.pub为公钥。私钥自己下载到本地电脑妥善保存,公钥则可以任意公开。

2、导入公钥
运行命令如下。

cat /root/.ssh/id_rsa.pub >>  /root/.ssh/authorized_keys

3、更改SSH配置文件
修改SSH的配置文件/etc/ssh/sshd_config,找到下面3行:

#RSAAuthentication yes
#PubkeyAuthentication yes
#AuthorizedKeysFile	.ssh/authorized_keys

将前面的#去掉后保存。
重启SSH服务,运行命令:
service sshd restart

4、制作用于putty的私钥
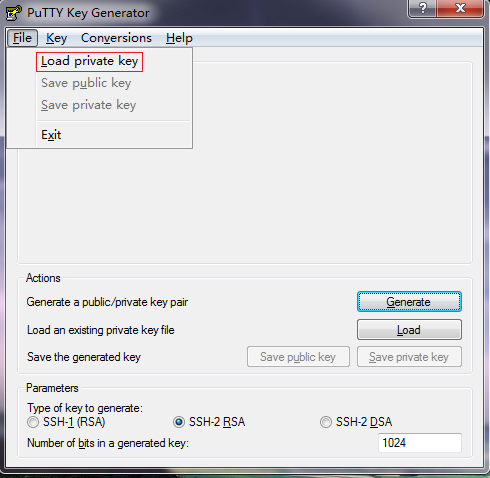
将VPS上的/root/.ssh/id_rsa下载到本地,利用PUTTYGEN.EXE转换为putty用的ppk文件。
keygen1

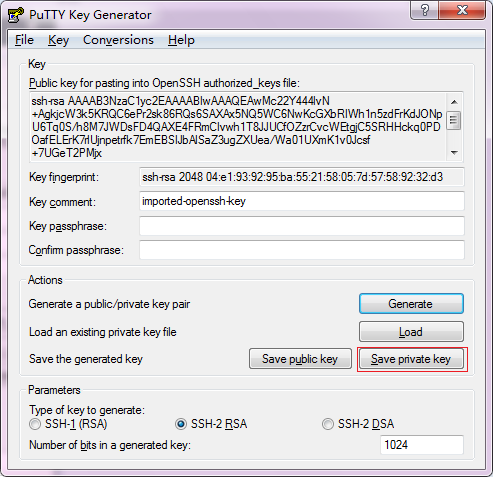
点击File,Load private key,导入/root/.ssh/id_rsa文件。成功后的图片如下所示:
keygen2

点击Save private key按钮,生成一个后缀为ppk的文件,比如起名为teddysun.ppk,这个文件就是已经制作好的用于putty无密码登录的私钥了,妥善保存。

5、配置putty
最简便的一个方法是创建一个桌面快捷方式,双击即可无密码登录到VPS。
找到putty.exe文件,然后右键创建桌面快捷方式,再到桌面上编辑这个快捷方式,在目标一栏中,修改参数如下。

"C:\Program Files\PUTTY\PUTTY.EXE" -i "D:\key\teddysun.ppk" root@xxx.xxx.xxx.xxx

修改为存放私钥的完整路径,将xxx.xxx.xxx.xxx替换为你的VPS的IP地址即可。

现在,你可以双击建好的putty快捷方式,看看是否已经可以无密码登录了。

6、关闭SSH密码登陆
在上述第5步验证OK后,出于安全需要就可以关闭SSH的密码登录。
修改SSH的配置文件/etc/ssh/sshd_config,找到下面1行:

PasswordAuthentication yes

修改为:

PasswordAuthentication no

重启SSH服务,运行命令:
service sshd restart

搞定,收工。至此,就只能用私钥登录到VPS了,安全性大大增强了。最后,顺便说一句,别跟我说私钥弄丢了怎么办(我都说了要妥善保存的了)。

转载请注明:秋水逸冰 » SSH无密码登录及putty设置

发表我的评论
取消评论

请输入正确答案后提交评论 *超出时限。 请再次填写验证码。

表情

Hi,您需要填写昵称和邮箱!

  • 昵称 (必填)
  • 邮箱 (必填)
  • 网址

网友最新评论 (18)

  1. 我是小白,在第三步卡住了... #RSAAuthentication yes #这个没找到 #PubkeyAuthentication yes #这个有几项,有“#”号和没“#”号都有 #AuthorizedKeysFile .ssh/authorized_keys #这个也... 就这个我没找着:#RSAAuthentication yes我的是centos7, 以下是/root/etc/sshd_config文件内容 求大神回复 # This is the sshd server system-wide configuration file. See # sshd_config(5) for more information. # This sshd was compiled with PATH=/usr/local/bin:/usr/bin # The strategy used for options in the default sshd_config shipped with # OpenSSH is to specify options with their default value where # possible, but leave them commented. Uncommented options override the # default value. # If you want to change the port on a SELinux system, you have to tell # SELinux about this change. # semanage port -a -t ssh_port_t -p tcp #PORTNUMBER # #Port 22 #AddressFamily any #ListenAddress 0.0.0.0 #ListenAddress :: HostKey /etc/ssh/ssh_host_rsa_key #HostKey /etc/ssh/ssh_host_dsa_key HostKey /etc/ssh/ssh_host_ecdsa_key HostKey /etc/ssh/ssh_host_ed25519_key # Ciphers and keying #RekeyLimit default none # Logging #SyslogFacility AUTH SyslogFacility AUTHPRIV #LogLevel INFO # Authentication: #LoginGraceTime 2m #PermitRootLogin yes #StrictModes yes #MaxAuthTries 6 #MaxSessions 10 #PubkeyAuthentication yes # The default is to check both .ssh/authorized_keys and .ssh/authorized_keys2 # but this is overridden so installations will only check .ssh/authorized_keys AuthorizedKeysFile .ssh/authorized_keys #AuthorizedPrincipalsFile none #AuthorizedKeysCommand none #AuthorizedKeysCommandUser nobody # For this to work you will also need host keys in /etc/ssh/ssh_known_hosts #HostbasedAuthentication no # Change to yes if you don't trust ~/.ssh/known_hosts for # HostbasedAuthentication #IgnoreUserKnownHosts no # Don't read the user's ~/.rhosts and ~/.shosts files #IgnoreRhosts yes # To disable tunneled clear text passwords, change to no here! #PasswordAuthentication yes #PermitEmptyPasswords no PasswordAuthentication yes # Change to no to disable s/key passwords #ChallengeResponseAuthentication yes ChallengeResponseAuthentication no # Kerberos options #KerberosAuthentication no #KerberosOrLocalPasswd yes #KerberosTicketCleanup yes #KerberosGetAFSToken no #KerberosUseKuserok yes # GSSAPI options GSSAPIAuthentication yes GSSAPICleanupCredentials no #GSSAPIStrictAcceptorCheck yes #GSSAPIKeyExchange no #GSSAPIEnablek5users no # Set this to 'yes' to enable PAM authentication, account processing, # and session processing. If this is enabled, PAM authentication will # be allowed through the ChallengeResponseAuthentication and # PasswordAuthentication. Depending on your PAM configuration, # PAM authentication via ChallengeResponseAuthentication may bypass # the setting of "PermitRootLogin without-password". # If you just want the PAM account and session checks to run without # PAM authentication, then enable this but set PasswordAuthentication # and ChallengeResponseAuthentication to 'no'. # WARNING: 'UsePAM no' is not supported in Red Hat Enterprise Linux and may cause several # problems. UsePAM yes #AllowAgentForwarding yes #AllowTcpForwarding yes #GatewayPorts no X11Forwarding yes #X11DisplayOffset 10 #X11UseLocalhost yes #PermitTTY yes #PrintMotd yes #PrintLastLog yes #TCPKeepAlive yes #UseLogin no #UsePrivilegeSeparation sandbox #PermitUserEnvironment no #Compression delayed #ClientAliveInterval 0 #ClientAliveCountMax 3 #ShowPatchLevel no #UseDNS yes #PidFile /var/run/sshd.pid #MaxStartups 10:30:100 #PermitTunnel no #ChrootDirectory none #VersionAddendum none # no default banner path #Banner none # Accept locale-related environment variables AcceptEnv LANG LC_CTYPE LC_NUMERIC LC_TIME LC_COLLATE LC_MONETARY LC_MESSAGES AcceptEnv LC_PAPER LC_NAME LC_ADDRESS LC_TELEPHONE LC_MEASUREMENT AcceptEnv LC_IDENTIFICATION LC_ALL LANGUAGE AcceptEnv XMODIFIERS # override default of no subsystems Subsystem sftp /usr/libexec/openssh/sftp-server # Example of overriding settings on a per-user basis #Match User anoncvs # X11Forwarding no # AllowTcpForwarding no # PermitTTY no # ForceCommand cvs server
    小韩7年前(2018-02-07)回复
    • #PubkeyAuthentication yes 这一行前面的#去掉。 AuthorizedKeysFile .ssh/authorized_keys 这一行已经配置OK了。 我写这篇文章的时候,还是 CentOS 6 时代。
      秋水逸冰7年前(2018-02-07)回复
  2. 看着您的教程顺利做到第5步。但不知为何没有成功登录,跳出network error:Connection refused 文件权限也设置成600了,google了很多 但都没有解决 请问能指点一下吗 多谢
    Kk8年前(2017-02-16)回复
    • 同样的问题。 不知道是不是SSH端口不是默认的22端口的原因。
      GG4年前(2020-09-03)回复
  3. 私钥自己下载到本地电脑妥善保存后是不是就可以把他从vps上面删掉啦?
    zero9年前(2016-02-12)回复
    • 还有就是以防万一,我把密钥也加密码了, 加了个简单些的是不是只要对方得不到我的密钥,密码暴露也没事吧。。。
      zero9年前(2016-02-12)回复
      • 私钥下载后可以在 VPS 上删除。 密钥加密码是非常正确的。
        Teddysun9年前(2016-02-12)回复
  4. 弱弱的问一下,这些命令适用于ubuntu么。。。
    ShannonGu9年前(2016-01-23)回复
    • Ubuntu和本文的介绍有出入,不太一样。
      秋水逸冰9年前(2016-01-23)回复
  5. hi. "私钥自己下载到本地电脑妥善保存",应该是下载到本地的~/.ssh/目录。下载到其他目录是不行的。
    fish9年前(2016-01-01)回复
  6. 请问为什么service sshd restart提示 sshd: unrecognized service 使用密钥登陆正常,但是无法禁用密码登录。尝试sudo /etc/init.d/ssh restart也无法重启服务。
    qgpmzf9年前(2015-08-30)回复
    • 你确定是在 CentOS 下这么操作的么? 应该是 /etc/init.d/sshd restart 吧。
      秋水逸冰9年前(2015-08-31)回复
  7. 将VPS上的/root/.ssh/id_rsa下载到本地,centos,能否写一下命令?
    gabriel9年前(2015-07-15)回复
    • 写什么命令? 用 winscp 登录 root 后把这个文件拖下来就好了。
      秋水逸冰9年前(2015-07-16)回复
  8. 丢了还不得重装系统?
    免费资源部落11年前(2013-07-14)回复
    • 私钥要是丢了那就只能重装系统了。不过有的VPS面板有控制台,应该是可以进去的。我没试过。
      秋水逸冰11年前(2013-07-14)回复
      • 秋大你好,请问开了密匙认证后另外篇文章所说的最低权限账号还有办法用吗?
        Andy9年前(2015-08-31)回复
        • 密钥认证是针对每个用户的。 跟那个最低权限的不冲突。
          秋水逸冰9年前(2015-08-31)回复